

Table of Contents
Intro
If you know about CI and Github Pages in general, you can skip this section and go straight to the action (github action!)!
If you just want the .yml config code, you can find it in the conclusion.
I have done my fair share of website deploying with good ol’ FTP over the years. You simply copy the files to the server, and you’re good to go. There are however, many downsides of taking that approach which I’m not gonna dive into for this post. Let’s discuss a more modern, and actually easier to work with, approach.
CI in a nutshell
Nowadays we do things automatically with the use of CI (Continuous Integration). TLDR: You integrate the development, version control, build, testing, and deployment of your website into one beautiful continuous cycle, that usually goes:
code > commit > pull request > tests > build > merge > deployThe steps from tests to deploy are usually handled by some CI service. There are many like Circle CI, Gitlab CI, and the one we’ll be using here: Github Actions. The reason I mentioned these 3 in specific is that I have used them in the past and know that they have free plans to get you started. These free plans are probably more than you need for smaller/personal projects. There are however many other services out there that do this.
What these services do is basically run a bunch of shell commands on some server somewhere. You usually have to configure what commands will be executed. There are exceptions, such as Vercel which specializes in Next.js projects and does everything that needs to be done out of the box for that kind of project, so that may be a good solution for you.
If that sounds interesting to you, but you’re not building with Next.js, you can probably look it up and find services that do the same for whatever framework you’re using.
Github Pages
Github Pages is a free service from github that serves website pages straight from your repo. Keep in mind that you must leave the website’s code public for this to work, so don’t use it if you have sensitive code there. In my case, it was perfect, as my website can also serve as a showcase of my work/coding,
Important Info: Github Pages will, by default, process your pages as if they were built with Jekyll, a blog aware static website generator. If you are not using Jekyll to build your website, you will have to tell github pages to skip this step. If you are using jekyll however, you don’t even need CI or anything, github pages will build and serve it straight from the repo automatically.
Github pages can serve pages from a variety of sources. You can have your pages in a gh-pages branch, or in a docs folder inside your master branch. Visit The Docs to find out more. We’ll be deploying it to the gh-pages branch here.
Github Actions
Github actions is a free-to-start CI service from github. There are many pre-made actions that do specific jobs for you. For instance, in this guide we’ll be using an action that deploys to github pages using the gh-pages lib. There are actions that release libs to NPM, there are ones that run build scripts for many popular frameworks and so on.
Let’s get down to business!
Enough with the chatter, let’s get going.
Step 1: Your project
First of all, you will need your project (do I even have to say that?).
In my case, I’ll be using my own website as an example. This website is built with Next.js. Next.js has the ability to generate a static website (plain old HTML + CSS + JS) that can be run directly in the browser. Here are a few tips for different kind of projects:
- Plain HTML: If you are building a plain html static website, you are good to go! Skip to the next step.
- React project: You will need to know about the
buildscript. It generates a production ready build of your project. - Next.js project: With Next, you will need to know about the
buildandexportscripts, that will make the website ready for deploy. - Any other whatever.js project: You probably got the gist of it by now, just see the docs of your framework on how to make a production build.
REALLY Important Info:
Your project CANNOT contain server side rendering (code that runs on the server side after the build) for this. Github pages can only serve a static HTML in the end, there is no server running behind that we can take control of.
For instance, my website has Next.js’ getStaticProps employed in some pages. While this is server side code, it only runs at build time and that’s fine. If I had been using getServerSideProps anywhere it wouldn’t work. In that case, I would have to rewrite my code to make data fetching and other stuff that might be going on in the server side to happen at run time on the client side (like instead of querying a database directly, we would instead do a fetch on an API)
Step 2: Github Repo Name & Settings
You will need your project to be in a github repo named as such:
username.github.ioIn my case, it’s lipe-dev.github.io.
You can, also, make a github pages homepage for your projects instead of making one for your user. In that case the project name can be whatever you want, and after you configure github pages to serve your website it will be on the address: username.github.io/project-name
And under that project’s settings page, you will need to configure Github pages like so:
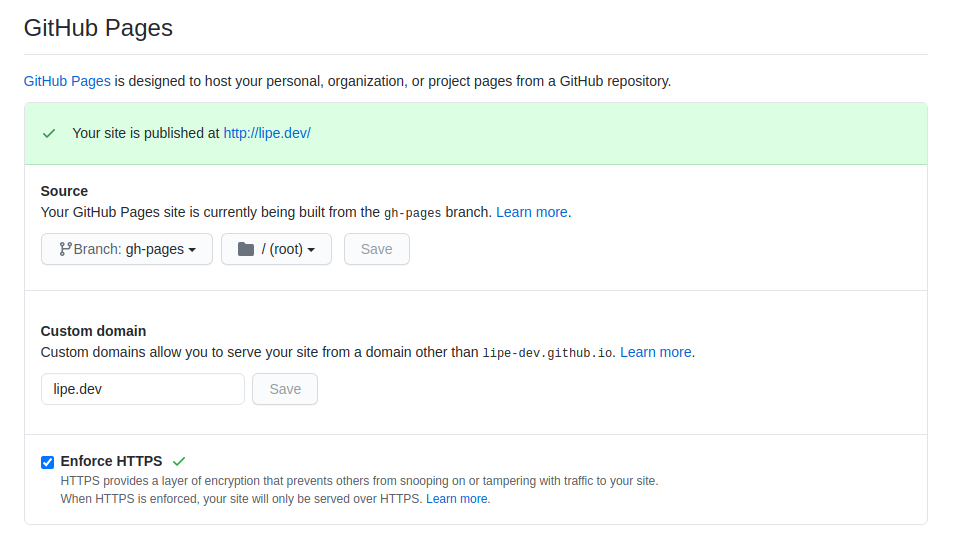
Note that I have https and a custom domain setup, do NOT do that right now. We will configure that later after we’re done. It’s a whole another can of worms to deal with.
Step 3: Github Actions Configuration
Here is where the fun begins.
I will not be going too in depth with the config file syntax here, because: 1 - I am not an expert, and 2 - There is just way too much to cover here. So let’s begin with the basics to get rolling:
The plan here is to set up the workflow to go as follows:
- A new push or pull request happens on Master branch (that will be our “ready for production” branch)
- The CI server picks up the updated code with a git checkout
- The CI server will set up the Node.js environment (which I need in my case, you may need something else like Python, or PHP, or whatever you’re using)
- The CI server will install the project’s dependencies (dev dependencies are installed here too). In my case, it is done with
yarn - The CI server will generate the production build (I’m using Next.js build scripts here, you might be using something else)
- The CI server will tell github pages to not process this using Jekyll (because mine is a Next.js project)
- The CI server will push the built code to the
gh-pagesbranch, thus finishing the deployment process.
The github actions configuration lives in the .github/workflows/ folder at the root of your project. You can manually create a main.yml file there and add the contents below. However, we’ll take a look at the Github actions interface first.
First of all, let’s create the workflow. Go to https://github.com/
Here you can see there are a lot of pre-made workflows for you to choose from. Take a look at those later, as there might be ready-to-use solutions that will work for your projects. We will be going with the “setup a workflow yourself” option.
Github will make a simple boilerplate workflow for you. It’s pretty well documented with comments, so take a read there to understand what it does. Let’s start workflow-ing our plan from before:
The on config tells github actions to run this action on pushes and pull requests to the master branch, which is what we want.
For now, let’s just remove the useless “echo” job steps from our build job.
.github/workflows/main.yml
# This is a basic workflow to help you get started with Actions

name: CI

# Controls when the action will run.
# Triggers the workflow on push or pull request
# events but only for the master branch
on:
  push:
    branches: [ master ]
  pull_request:
    branches: [ master ]

# A workflow run is made up of one or more jobs that can run
#   sequentially or in parallel
jobs:
  # This workflow contains a single job called "build"
  build:
    # The type of runner that the job will run on
    runs-on: ubuntu-latest

    # Steps represent a sequence of tasks that will be executed as
    #   part of the job
    steps:
      # Checks-out your repository under $GITHUB_WORKSPACE,
      #     so your job can access it
      - uses: actions/checkout@v2

-      # Runs a single command using the runners shell
-      - name: Run a one-line script
-        run: echo Hello, world!

-      # Runs a set of commands using the runners shell
-      - name: Run a multi-line script
-        run: |
-          echo Add other actions to build,
-          echo test, and deploy your project.
The first step of the plan is already there. It’s the checkout code. Note that we are just calling a pre-made action, called actions/checkout@v2. This action will get the code from our repo to the CI machine, and we don’t have to manually write the commands. This action includes some optimization as well.
- name: Checkout 🛎️
      # Checks-out your repository under $GITHUB_WORKSPACE,
      #   so your job can access it
        uses: actions/checkout@v2
Next (no pun intended), we will be setting up the node environment in the CI machine. Github actions provides us with this handy action that we can use for this.
Once again, we are using another pre-made action, called action/setup-node@v1. It expects a with parameter specifying a version. If for some reason you need to build using more than one node version you can also pass an array there, and you can be as specific with the version numbers as you want. 12.x is fine for me.
.github/workflows/main.yml
name: CI

on:
  push:
    branches: [ master ]
  pull_request:
    branches: [ master ]

jobs:
  build-and-deploy:
    runs-on: ubuntu-latest

    steps:
      # Checks-out your repository under $GITHUB_WORKSPACE,
      #     so your job can access it
      - name: Checkout 🛎️
        uses: actions/checkout@v2

+      # Define a Node.js version to use
+      - name: Use Node.js 📦
+        uses: actions/setup-node@v1
+        with:
+          node-version: '12.x'
Now we can move on to installing dependencies and building the code with yarn (or use npm, or whatever tool you use)
.github/workflows/main.yml
name: CI

on:
  push:
    branches: [ master ]
  pull_request:
    branches: [ master ]

jobs:
  build-and-deploy:
    runs-on: ubuntu-latest

    steps:
      # Checks-out your repository under $GITHUB_WORKSPACE
      #     so your job can access it
      - name: Checkout 🛎️
        uses: actions/checkout@v2

      # Define a Node.js version to use
      - name: Use Node.js 📦
        uses: actions/setup-node@v1
        with:
          node-version: '12.x'

+      # Build using next build and next export
+      - name: Install and Build 🔧
+        run: |
+          yarn install --frozen-lockfile
+          yarn build
In my case, with Next.js, there is now an /out directory in my project with the results of this build. I know that create-react-app’s scripts will create a /build folder. Other frameworks will have different results. Check the documentation for yours by looking for “Making a production build on [whatever you’re using]“.
Intermission: This folder contains a static website in plain HTML, css and js files. We are deploying this to Github pages, which will by default process it with Jekyll. We don’t want that here, but if you’re deploying to somewhere else that does not have anything to do with Jekyll, you’re probably good to go. If your project is in jekyll, well, you’re also set.
Github pages will not process your website with jekyll if you add an empty .nojekyll file at the root of it. So let’s go ahead and add one to our /out folder.
Don’t forget this special touch…
.github/workflows/main.yml
name: CI

on:
  push:
    branches: [ master ]
  pull_request:
    branches: [ master ]

jobs:
  build-and-deploy:
    runs-on: ubuntu-latest

    steps:
      # Checks-out your repository under $GITHUB_WORKSPACE
      #     so your job can access it
      - name: Checkout 🛎️
        uses: actions/checkout@v2

      # Define a Node.js version to use
      - name: Use Node.js 📦
        uses: actions/setup-node@v1
        with:
          node-version: '12.x'

      # Build using next build and next export
      - name: Install and Build 🔧
        run: |
          yarn install --frozen-lockfile
          yarn build
+          touch out/.nojekyll
We are pretty much done! All that is left to do is send this code to the gh-pages branch of our repo. There is a very hand action for that called JamesIves/github-pages-deploy-action@3.6.1. Send JamesIves my regards, and thanks. Also, I stole the emoji idea from their example.
.github/workflows/main.yml
name: CI

on:
  push:
    branches: [ master ]
  pull_request:
    branches: [ master ]

jobs:
  build-and-deploy:
    runs-on: ubuntu-latest

    steps:
      # Checks-out your repository under $GITHUB_WORKSPACE
      #     so your job can access it
      - name: Checkout 🛎️
        uses: actions/checkout@v2

      # Define a Node.js version to use
      - name: Use Node.js 📦
        uses: actions/setup-node@v1
        with:
          node-version: '12.x'

      # Build using next build and next export
      - name: Install and Build 🔧
        run: |
          yarn install --frozen-lockfile
          yarn build
          touch out/.nojekyll

+      # Deploy with/to github pages
+      - name: Deploy 🚀
+        uses: JamesIves/github-pages-deploy-action@3.6.1
+        with:
+          GITHUB_TOKEN: ${{ secrets.GITHUB_TOKEN }}
+          BRANCH: gh-pages # The branch the action should deploy to.
+          FOLDER: out # The folder the action should deploy.
+          CLEAN: true # Auto-Remove deleted files from the deploy branch
This action uses the gh-pages package to make the push. Here are some info about the params we passed there:
-GITHUB_TOKEN is provided automatically by github to the CI server, you don’t need to change anything there unless it’s not working.
-BRANCH is the branch where we are sending the /out folder to. You can send to others, if you want to configure github pages to serve something else.
-FOLDER is the resulting folder from our build, in this case /out
And that’s it! Congratulations, your website will now be deployed automatically to github pages.
Conclusion
This is a pretty straight forward process, and a great way for people who never used CI before to get their toes wet. On top of that, you now have a website running for free on Github’s servers!
Make sure you read the docs on Github’s website to see the limitations, but a static page probably won’t break them. Here is what the finished config file looks like:
Now just go ahead and push some code (it can even be just this yml code!) to your master branch on github, or make a pull request, and you will see a magic server somewhere executing these workflows in the Actions tab!
.github/workflows/main.yml
name: CI

on:
  push:
    branches: [ master ]
  pull_request:
    branches: [ master ]

jobs:
  build-and-deploy:
    runs-on: ubuntu-latest

    steps:
      - name: Checkout 🛎️
      # Checks-out your repository under $GITHUB_WORKSPACE,
      #   so your job can access it
        uses: actions/checkout@v2

      # Define a Node.js version to use
      - name: Use Node.js 📦
        uses: actions/setup-node@v1
        with:
          node-version: '12.x'

      # Build using next build and next export
      - name: Install and Build 🔧
        run: |
          yarn install --frozen-lockfile
          yarn build
          touch out/.nojekyll

      # Deploy with/to github pages
      - name: Deploy 🚀
        uses: JamesIves/github-pages-deploy-action@3.6.1
        with:
          GITHUB_TOKEN: ${{ secrets.GITHUB_TOKEN }}
          BRANCH: gh-pages # The branch the action should deploy to.
          FOLDER: out # The folder the action should deploy.
          CLEAN: true # Auto-Remove deleted files from the deploy branch
Final Tips
You can make different workflows for pull requests to just make them check if tests pass, the project builds and linters pass successfully, and save the deployment part just for merges on the master branch.
You can separate steps in different jobs to run them in parallel if possible (or make them sequential with one requiring other)
Even if you are using Jekyll, you can have an action to push the code from master to wherever you want github pages to serve it from
If you have any questions, or just wanna talk, reach out! I’ll be thrilled to hear about it.